FATE AllinOne Deployment Guide
Warning: This document is designed for a quick start deployment only. Other deployment methods are recommended for production environments, such as AnsibleFATE.
The parties can access each other through ssh if you deploy multiple parties at the same time following this document. It will cause security problems.
1. Server Configuration
| Server | |
|---|---|
| Quantities | 1 or 2 |
| Configuration | 8 cores /16GB memory / 500GB hard disk / 10M bandwidth |
| Operating System | CentOS Linux 7.2+/Ubuntu 18.04 |
| Dependency Package | Installed automatically during deployment |
| User | User: app, Owner: apps (the app user should be able to execute sudo su root without entering a password) |
| File System | 1. Mount the 500G hard disk in the /data directory; 2. Create the /data/projects directory with the directory owner of app:apps |
2. Cluster Planning
| Party | Hostname | IP Address | Operating System | Installed Software | Service |
|---|---|---|---|---|---|
| PartyA | VM_0_1_centos | 192.168.0.1 | CentOS 7.2/Ubuntu 18.04 | fate, eggroll, mysql | fate_flow, fateboard, clustermanager, nodemanager, rollsite, mysql |
| PartyB | VM_0_2_centos | 192.168.0.2 | CentOS 7.2/Ubuntu 18.04 | fate, eggroll, mysql | fate_flow, fateboard, clustermanager, nodemanager, rollsite, mysql |
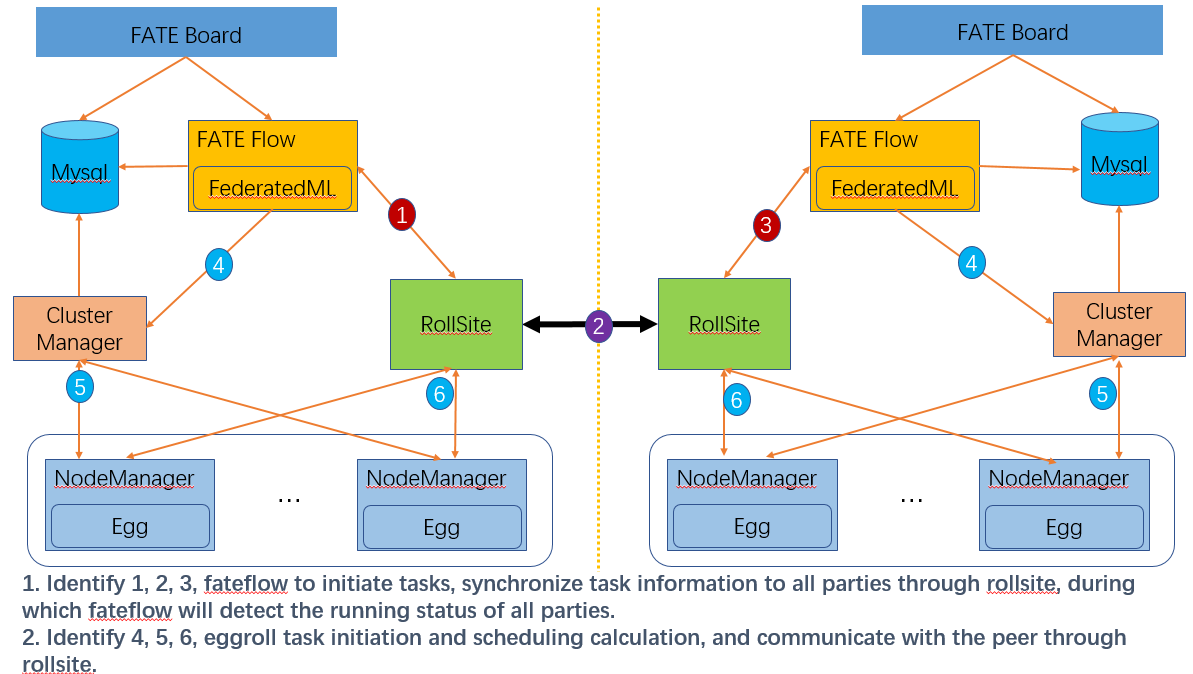
The architecture diagram:
 |
|---|
| The architecture diagram |
3. Component Description
| Software | Component | Port | Description |
|---|---|---|---|
| fate | fate_flow | 9360; 9380 | The management module of federated learning task flow |
| fate | fateboard | 8080 | The visualization module of federated learning process |
| eggroll | clustermanager | 4670 | The cluster manager manages clusters |
| eggroll | nodemanager | 4671 | The node manager manages the resources of each machine |
| eggroll | rollsite | 9370 | The cross-site/party communication component, equivalent to proxy+federation in previous versions |
| mysql | mysql | 3306 | The data storage, relied on by clustermanager and fateflow |
4. Basic Environment Configuration
4.1. Configure hostname
1. Modify hostname
Execute as root user on 192.168.0.1:
hostnamectl set-hostname VM_0_1_centos
Execute as root user on 192.168.0.2:
hostnamectl set-hostname VM_0_2_centos
2. Add Host Mapping
Execute as root user on the destination server (192.168.0.1, 192.168.0.2.:
vim /etc/hosts
192.168.0.1 VM_0_1_centos
192.168.0.2 VM_0_2_centos
4.2. Shutdown SELinux (Not Recommended)
Execute as root user on the destination server (192.168.0.1, 192.168.0.2.:
Confirm if selinux is installed
For CentOS, execute: rpm -qa | grep selinux
For Ubuntu, execute: apt list --installed | grep selinux
If selinux is installed, execute: setenforce 0
4.3. Modify Linux System Parameters
Execute as root user on the destination server (192.168.0.1, 192.168.0.2.:
- Clean up the 20-nproc.conf file
cd /etc/security/limits.d
ls -lrt 20-nproc.conf
If this file exists: mv 20-nproc.conf 20-nproc.conf_bak
- vim /etc/security/limits.conf
* soft nofile 65535
* hard nofile 65535
* soft nproc 65535
* hard nproc 65535
Log in again, and execute ulimit -a to check whether the change takes effect
4.4. Turn Firewall Off (Not Recommended)
Execute as root user on the destination server (192.168.0.1, 192.168.0.2)
For CentOS:
systemctl disable firewalld.service
systemctl stop firewalld.service
systemctl status firewalld.service
For Ubuntu:
ufw disable
ufw status
4.5. Initialize Software Environment
1. Create User
Execute as root user on the destination server (192.168.0.1, 192.168.0.2)
groupadd -g 6000 apps
useradd -s /bin/bash -g apps -d /home/app app
passwd app
2. Configure sudo
Execute as root user on the destination server (192.168.0.1, 192.168.0.2)
vim /etc/sudoers.d/app
app ALL=(ALL) ALL
app ALL=(ALL) NOPASSWD: ALL
Defaults !env_reset
3. Configure Passwordless SSH Login
a. Execute as app user on the destination server (192.168.0.1, 192.168.0.2)
su app
ssh-keygen -t rsa
cat ~/.ssh/id_rsa.pub >> /home/app/.ssh/authorized_keys
chmod 600 ~/.ssh/authorized_keys
b. Merge id_rsa_pub file
Copy authorized_keys of 192.168.0.1 to ~/.ssh directory of 192.168.0.2, append id_rsa.pub of 192.168.0.2 to authorized_keys, then copy it back to 192.168.0.1
Execute as app user on 192.168.0.1
scp ~/.ssh/authorized_keys app@192.168.0.2:/home/app/.ssh
Enter the password
Execute as app user on 192.168.0.2
cat ~/.ssh/id_rsa.pub >> /home/app/.ssh/authorized_keys
scp ~/.ssh/authorized_keys app@192.168.0.1:/home/app/.ssh
Overwrite the previous file
c. Execute ssh testing as app user on the destination server (192.168.0.1, 192.168.0.2.
ssh app@192.168.0.1
ssh app@192.168.0.2
4.6. Increase Virtual Memory
destination server (192.168.0.1, 192.168.0.2, 192.168.0.3.
In the production environment, an additional of 128G virtual memory is required for RAM computing. Make sure to check if there is enough storage space before operation.
Create manually, and execute as root user:
cd /data
dd if=/dev/zero of=/data/swapfile128G bs=1024 count=134217728
mkswap /data/swapfile128G
swapon /data/swapfile128G
cat /proc/swaps
echo '/data/swapfile128G swap swap defaults 0 0' >> /etc/fstab
Or create by using the code package script in Section 5.1, and execute as app user:
bash /data/projects/fate_cluster_install_${version}_release/tools-install/makeVirtualDisk.sh
Waring: please make sure has enough space of your disk first!!! (Please make sure there is enough storage space)
current user has sudo privilege(yes|no):yes      (Whether the user has sudo privilege; enter yes and do not abbreviate it)
Enter store directory:/data    (Set the storage path for virtual memory files; make sure the directory exists and do not set it to the root directory)
Enter the size of virtual disk(such as 64G/128G):128G  (Set the size of virtual memory files; it should be a multiple of 32G; make sure the figure is followed by the unit G; generally set it to 128G)
/data 32 1
32768+0 records in
32768+0 records out
34359738368 bytes (34 GB) copied, 200.544 s, 171 MB/s
Setting up swapspace version 1, size = 33554428 KiB
no label, UUID=58ce153c-feac-4989-b684-c100e4edca0b
/data 32 2
32768+0 records in
32768+0 records out
34359738368 bytes (34 GB) copied, 200.712 s, 171 MB/s
Setting up swapspace version 1, size = 33554428 KiB
no label, UUID=d44e27ed-966b-4477-b46e-fcda4e3057c2
/data 32 3
32768+0 records in
32768+0 records out
34359738368 bytes (34 GB) copied, 200.905 s, 171 MB/s
Setting up swapspace version 1, size = 33554428 KiB
no label, UUID=ab5db8d7-bc09-43fb-b23c-fc11aef1a3b6
/data 32 4
32768+0 records in
32768+0 records out
34359738368 bytes (34 GB) copied, 201.013 s, 171 MB/s
Setting up swapspace version 1, size = 33554428 KiB
no label, UUID=c125ede3-7ffd-4110-9dc8-ebdf4fab0fd1
Verify
cat /proc/swaps

Filename                                Type            Size    Used    Priority
/data/swapfile32G_1                     file            33554428        0       -1
/data/swapfile32G_2                     file            33554428        0       -2
/data/swapfile32G_3                     file            33554428        0       -3
/data/swapfile32G_4                     file            33554428        0       -4

free -m
              total        used        free      shared  buff/cache   available
Mem:          15715        6885          91         254        8739        8461
Swap:        131071           0      131071
5. Project Deployment
Note: In this guide, the installation directory is /data/projects/ and the execution user is app by default. At the time of installation, a use can modify them according to the actual situation.
5.1. Obtain Project
Execute as app user on the destination server (192.168.0.1 with extranet environment)
Go to the /data/projects/ directory of the execution node and execute:
Note: Replace ${version} with specific FATE version number,can be viewed on the release page.
cd /data/projects/
wget https://webank-ai-1251170195.cos.ap-guangzhou.myqcloud.com/fate/${version}/release/fate_cluster_install_${version}_release.tar.gz
tar xzf fate_cluster_install_${version}_release.tar.gz

Note: version without character v, such as fate_cluster_install_1.x.x_release.tar.gz
5.2. Pre-Deployment Check
Execute as app user on the destination server (192.168.0.1, 192.168.0.2)
Copy the check script fate_cluster_install_${version}_release/tools-install/check.sh from 192.168.0.1 to 192.168.0.2
#Execute the script check on the servers 192.168.0.1 and 192.168.0.2 respectively
bash ./check.sh

#Make sure that sudo is configured for app user
#Virtual memory, minimum 128G in size; otherwise, refer to section 4.6 for resetting
#File handles, minimum 65535 in number; otherwise, refer to section 4.3 for resetting
#User processes, minimum 64000 in number; otherwise, refer to section 4.3 for resetting
#Make sure there is no fate process and port conflict before deployment
#Check if the /etc/my.cnf exists, and execute mv if any; check if the /data/projects/fate directory exists, and execute mv to back up the fate directory if any.
5.3. Profile Modification and Examples
Execute as app user on the destination server (192.168.0.1)
Modify the profile: fate_cluster_install_${version}_release/allInone/conf/setup.conf.
vi fate_cluster_install_${version}_release/allInone/conf/setup.conf
Description of Profile setup.conf
| Configuration Item | Item Value | Description |
|---|---|---|
| roles | Default: "host", "guest" | The deployment roles: host or guest |
| version | Default: {version} | The version of FATE |
| pbase | Default: /data/projects | The root directory of the project |
| pname | Default: fate | project name |
| lbase | Default: /data/logs | Keep the default value and do not modify |
| ssh_user | Default: app | he user who connects the destination machine by ssh,and the owner of the deployed file |
| ssh_group | Default: apps | The group which the user who connects the destination machine by ssh belongs to, and the group which the deployed file belongs to |
| ssh_port | Default: 22, modify according to the actual situation |
The ssh connection port; verify the port before deployment, otherwise the connection error will be reported |
| eggroll_dbname | Default: eggroll_meta | The name of the DB that eggroll is connected to |
| fate_flow_dbname | Default: fate_flow | The name of the DB that fate_flow, fateboard, etc. are connected to |
| mysql_admin_pass | Default: | The password of mysql admin (root) |
| redis_pass | Default: | The password of redis (currently not used) |
| mysql_user | Default: fate | The account for mysql application connection |
| mysql_port | Default: 3306, modify according to the actual situation | The port listened by the mysql service |
| host_id | Default: 10000, modify according to the implementation plan | The party id of host |
| host_ip | 192.168.0.1 | The ip of host |
| host_mysql_ip | Match host_ip by default | The ip of host mysql |
| host_mysql_pass | Default: | The account for host mysql application connection |
| guest_id | Default: 9999, modify according to the implementation plan | The party id of guest |
| guest_ip | 192.168.0.2 | The ip of guest |
| guest_mysql_ip | Match guest_ip by default | The ip of guest mysql |
| guest_mysql_pass | Default: | The account for guest mysql application connection |
| dbmodules | Default: "mysql" | The list of deployment modules for DB components, such as "mysql" |
| basemodules | Default: "tools", "base", "java", "python", "eggroll", "fate" | The list of deployment modules for non-DB components, such as "tools", "base", "java", "python", "eggroll", "fate" |
| fateflow_grpc_port | Default: 9360 | The fateflow grpc service port |
| fateflow_http_port | Default: 9380 | The fateflow http service port |
| fateboard_port | Default: 8080 | The fateboard service port |
| rollsite_port | Default: 9370 | The rollsite service port |
| clustermanager_port | Default: 4670 | The clustermanager service port |
| nodemanager_port | Default: 4671 | The nodemanager service port |
1. Simultaneous Deployment of Two Hosts partyA+partyB
#to install role
roles=( "host" "guest" )

version="{version}"
#project base
pbase="/data/projects"
#project name
pname="fate"

#log directory
lbase="/data/logs"

#user who connects dest machine by ssh
ssh_user="app"
ssh_group="apps"
#ssh port
ssh_port=22

#eggroll_db name
eggroll_dbname="eggroll_meta"
#fate_flow_db name
fate_flow_dbname="fate_flow"

#mysql init root password
mysql_admin_pass="fate_dev"

#redis passwd
redis_pass=""

#mysql user
mysql_user="fate"
#mysql port
mysql_port="3306"

#host party id
host_id="10000"
#host ip
host_ip="192.168.0.1"
#host mysql ip
host_mysql_ip="${host_ip}"
host_mysql_pass="fate_deV2999"

#guest party id
guest_id="9999"
#guest ip
guest_ip="192.168.0.2"
#guest mysql ip
guest_mysql_ip="${guest_ip}"
guest_mysql_pass="fate_deV2999"

#db module lists
dbmodules=( "mysql" )

#base module lists
basemodules=( "tools" "base" "java" "python" "eggroll" "fate" )

fateflow_grpc_port=9360
fateflow_http_port=9380
fateboard_port=8080

rollsite_port=9370
clustermanager_port=4670
nodemanager_port=4671
2. Single-Party Deployment
#to install role
roles=( "host" )

version="{version}"
#project base
pbase="/data/projects"
#project name
pname="fate"

#log directory
lbase="/data/logs"

#user who connects dest machine by ssh
ssh_user="app"
ssh_group="apps"
#ssh port
ssh_port=22

#eggroll_db name
eggroll_dbname="eggroll_meta"
#fate_flow_db name
fate_flow_dbname="fate_flow"

#mysql init root password
mysql_admin_pass="fate_dev"

#redis passwd
redis_pass=""

#mysql user
mysql_user="fate"
#mysql port
mysql_port="3306"

#host party id
host_id="10000"
#host ip
host_ip="192.168.0.1"
#host mysql ip
host_mysql_ip="${host_ip}"
host_mysql_pass="fate_deV2999"

#guest party id
guest_id=""
#guest ip
guest_ip=""
#guest mysql ip
guest_mysql_ip="${guest_ip}"
guest_mysql_pass=""

#db module lists
dbmodules=( "mysql" )

#base module lists
basemodules=( "tools" "base" "java" "python" "eggroll" "fate" )

fateflow_grpc_port=9360
fateflow_http_port=9380
fateboard_port=8080

rollsite_port=9370
clustermanager_port=4670
nodemanager_port=4671
5.4 Deployment
Modify the corresponding configuration items in the setup.conf file according to the above configuration definition, then execute the deployment script under the fate_cluster_install_${version}_release/allInone directory:
cd fate_cluster_install_${version}_release/allInone
nohup bash ./deploy.sh > logs/boot.log 2>&1 &
The deployment log is located in the fate_cluster_install_${version}_release/allInone/logs directory. A user can check it in real time to see if there are any errors:
tail -f ./logs/deploy.log (Just check it when the deployment is completed)
tail -f ./logs/deploy-guest.log (Print the deployment status at the GUEST end in real time)
tail -f ./logs/deploy-mysql-guest.log  (Print the deployment status of mysql at the GUEST end in real time)
tail -f ./logs/deploy-host.log    (Print the deployment status at the HOST end in real time)
tail -f ./logs/deploy-mysql-host.log    (Print the deployment status of mysql at the HOST end in real time)
5.5 Troubleshooting
- Eggroll Logs
/data/projects/fate/eggroll/logs/eggroll/bootstrap.clustermanager.err
/data/projects/fate/eggroll/logs/eggroll/clustermanager.jvm.err.log
/data/projects/fate/eggroll/logs/eggroll/nodemanager.jvm.err.log
/data/projects/fate/eggroll/logs/eggroll/bootstrap.nodemanager.err
/data/projects/fate/eggroll/logs/eggroll/bootstrap.rollsite.err
/data/projects/fate/eggroll/logs/eggroll/rollsite.jvm.err.log
- Fateflow Logs
/data/projects/fate/fateflow/logs/fate_flow
- Fateboard Logs
/data/projects/fate/fateboard/logs
6. Testing
6.1. Verify toy_example Deployment
A user must set 2 parameters for this testing: gid(guest partyid), hid(host partyid).
6.1.1. One-Sided Testing
- Execute on 192.168.0.1, with both gid and hid set to 10000:
source /data/projects/fate/bin/init_env.sh
flow test toy -gid 10000 -hid 10000
A result similar to the following indicates successful operation:
"2020-04-28 18:26:20,789 - secure_add_guest.py[line:126] - INFO: success to calculate secure_sum, it is 1999.9999999999998"
Tip: If the error "max cores per job is 1, please modify job parameters" appears, a user needs to modify the parameter task_cores to 1, add "--task-cores 1" to run toy test.
- Execute on 192.168.0.2, with both gid and hid set to 9999:
source /data/projects/fate/bin/init_env.sh
flow test toy -gid 9999 -hid 9999
A result similar to the following indicates successful operation:
"2020-04-28 18:26:20,789 - secure_add_guest.py[line:126] - INFO: success to calculate secure_sum, it is 1999.9999999999998"
6.1.2. Two-Sided Testing
Select 9999 as the guest and execute on 192.168.0.2:
source /data/projects/fate/bin/init_env.sh
flow test toy -gid 9999 -hid 10000
A result similar to the following indicates successful operation:
"2020-04-28 18:26:20,789 - secure_add_guest.py[line:126] - INFO: success to calculate secure_sum, it is 1999.9999999999998"
6.2 Minimization Testing
6.2.1. Upload Preset Data
Execute on 192.168.0.1 and 192.168.0.2 respectively:
source /data/projects/fate/bin/init_env.sh
fate_test data upload -t min_test
6.2.2. Fast Mode
Ensure that both the guest and host have uploaded the preset data with the given script.
In fast mode, the minimization testing script will use a relatively small breast dataset containing 569 pieces of data.
Select 9999 as the guest and execute on 192.168.0.2:
source /data/projects/fate/bin/init_env.sh
#One-sided testing
flow test min -gid 9999 -hid 9999 -aid 9999 -t fast
#Two-sided testing
flow test min -gid 9999 -hid 10000 -aid 10000 -t fast
Other parameters that may be useful include:
- -f: The file type used. Here, "fast" represents the breast dataset, and "normal" represents the default credit dataset.
- --add_sbt: When set to 1, the secureboost task will start after running lr. When set to 0, the secureboost task will not start. When not set, this parameter will default to 1.
The word "success" will display in the result after a few minutes to indicate the operation has been completed successfully. If "FAILED" appears or the program gets stuck, it means that the test has failed.
6.2.3. Normal Mode
Just replace "fast" with "normal" in the command. All other parts are identical to fast mode.
6.3. Fateboard Testing
Fateboard is a web service. When started, it allows a user to view task information by visiting http://192.168.0.1:8080 and http://192.168.0.2:8080. If there is a firewall, a user needs to turn it on.
7. System Operation and Administration
7.1. Service Management
Execute as app user on the destination server (192.168.0.1, 192.168.0.2).
7.1.1. Mysql Service Management
Start/Shutdown/View/Restart mysql service
cd /data/projects/fate/common/mysql/mysql-*
bash ./service.sh start|stop|status|restart
7.1.2. Eggroll Service Management
source /data/projects/fate/bin/init_env.sh
cd /data/projects/fate/eggroll
Start/Shutdown/View/Restart all modules:
bash ./bin/eggroll.sh all start/stop/status/restart
Start/Shutdown/View/Restart a single module (clustermanager, nodemanager, rollsite):
bash ./bin/eggroll.sh clustermanager start/stop/status/restart
7.1.3. FATE Service Management
- Start/Shutdown/View/Restart fate_flow service
source /data/projects/fate/bin/init_env.sh
cd /data/projects/fate/fateflow/bin
bash service.sh start|stop|status|restart
To start the modules on an individual basis, a user must start eggroll before fateflow, as fateflow requires eggroll to run.
- Start/Shutdown/Restart fateboard service
cd /data/projects/fate/fateboard
bash service.sh start|stop|status|restart
7.2. View Processes and Ports
Execute as app user on the destination server (192.168.0.1, 192.168.0.2.
7.2.1. View Processes
Check if the process is started according to the deployment plan.
ps -ef | grep -i clustermanager
ps -ef | grep -i nodemanager
ps -ef | grep -i rollsite
ps -ef | grep -i fate_flow_server.py
ps -ef | grep -i fateboard
7.2.2. View Process Ports
Check if the process port exists according to the deployment plan.
#clustermanager
netstat -tlnp | grep 4670
#nodemanager
netstat -tlnp | grep 4671
#rollsite
netstat -tlnp | grep 9370
#fate_flow_server
netstat -tlnp | grep 9360
#fateboard
netstat -tlnp | grep 8080
7.3. Service Logs
| Service | Log Path |
|---|---|
| eggroll | /data/projects/fate/eggroll/logs |
| fate_flow & task log | /data/projects/fate/fateflow/logs |
| fateboard | /data/projects/fate/fateboard/logs |
| mysql | /data/projects/fate/common/mysql/mysql-*/logs |
7.4. Space Clearance Rules
7.4.1. fateflow job log
Machine: The machine where the fate flow service is located
Directory: /data/projects/fate/fateflow/logs
Retention period: N=14 days
Rule: The directory starts with jobid, and the data whose jobid is N days ago is cleaned up
find /data/projects/fate/fateflow/logs/ -maxdepth 1 -mindepth 1 -mtime +N -type d ! -path "*/fate_flow" | xargs rm -rf
7.4.2. fateflow system log
Machine: The machine where the fate flow service is located
Directory: /data/projects/fate/fateflow/logs/fate_flow
Retention period: N=14 days
Rule: End with the date, clean up the data N days ago
find /data/projects/fate/fateflow/logs/fate_flow/ -maxdepth 1 -mtime +N -name "*.log.*" | xargs rm -rf
7.4.3. EggRoll Session log
Machine: eggroll node node
Directory: /data/projects/fate/eggroll/logs/
Retention period: N=14 days
Rule: The directory starts with jobid, and the data whose jobid is N days ago is cleaned up
find /data/projects/fate/eggroll/logs/ -maxdepth 1 -mindepth 1 -mtime +N -type d ! -path "*/eggroll" | xargs rm -rf
7.4.4. EggRoll system log
Machine: eggroll node node
Directory: /data/projects/fate/eggroll/logs/eggroll
Retention period: N=14 days
Rule: files in the history folder established by the end of the date and the year, and clean up the data N days ago
find /data/projects/fate/eggroll/logs/eggroll/ -maxdepth 1 -mtime +N -name "*.log.*" | xargs rm -rf
7.4.5. Calculating temporary data
Machine: eggroll node node
Directory: /data/projects/fate/eggroll/data/IN_MEMORY
Retention period: N=7 days
Rule: namespace starts with jobid, clean up data whose jobid is N days ago
find /data/projects/fate/eggroll/data/IN_MEMORY/ -maxdepth 1 -mindepth 1 -mtime +N -type d | xargs rm -rf
7.4.6. Job component output data
Machine: eggroll node node
Directory: /data/projects/fate/eggroll/data/LMDB
Retention period: N=14 days
Rule: namespace starts with output_data_jobid, clean up data whose jobid is N days ago
find /data/projects/fate/eggroll/data/LMDB/ -maxdepth 1 -mindepth 1 -mtime +N -type d -name "output_data_*" | xargs rm -rf